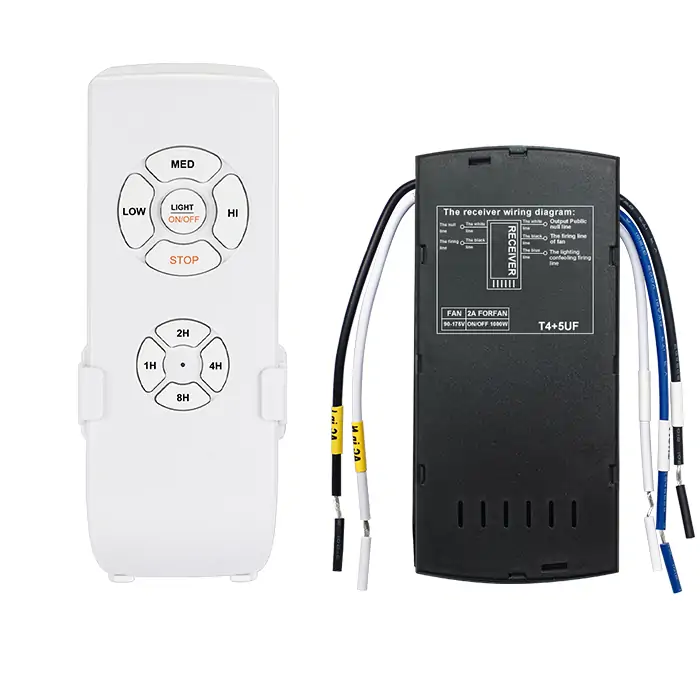
QIACHIP FLC05-E110V Instruction Manual AC 90V-175V 433MHz RF Ceiling Fan Light Remote Control Switch
Version: V1.0
Last Updated: 2025-09-15
Model: FLC05-E110V
Product Size
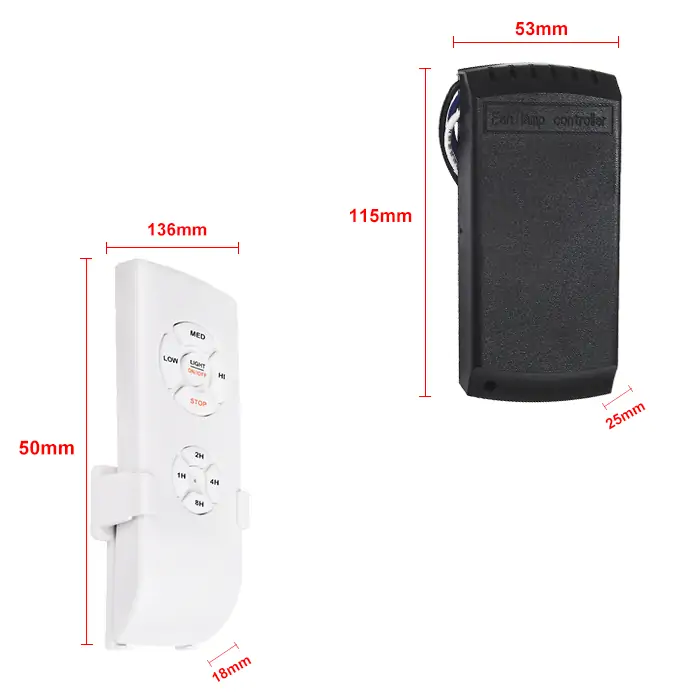
- Receiver Length (L) x Width (W) x Height (H): 115mm x 53mm x 25mm
- Remote Control Length (L) x Width (W) x Height (H): 136mm x 50mm x 18mm
Component Description
Receiver
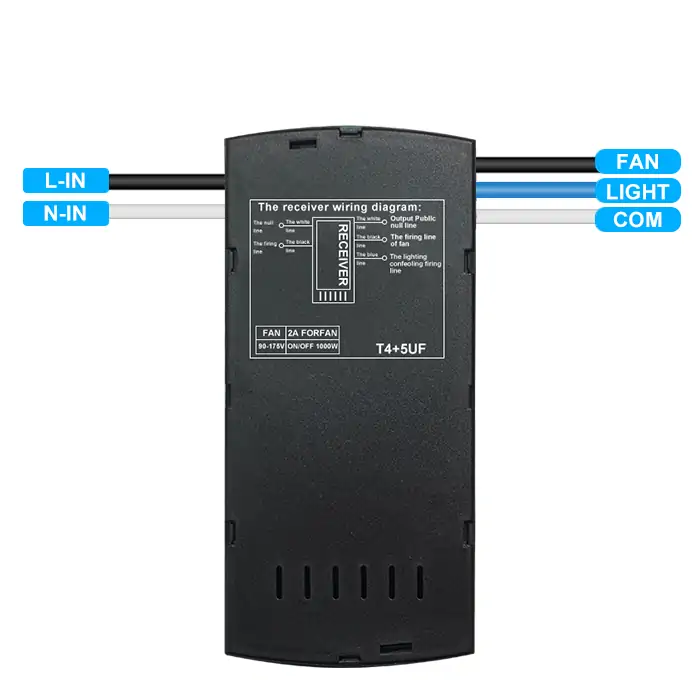
- L-IN: Input live wire terminal
- N-IN: Input neutral wire terminal
- FAN: Output fan live wire
- LIGHT: Output light live wire
- COM: Common neutral terminal
Remote control
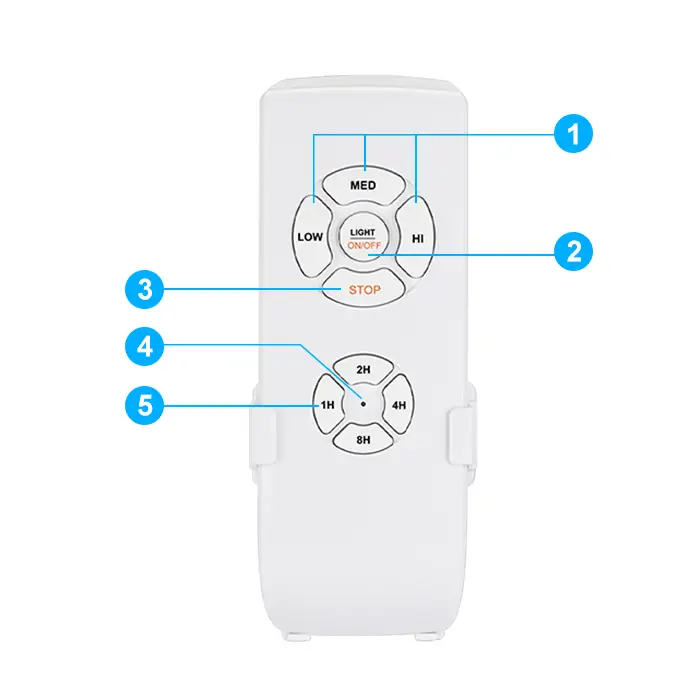
- 1: Fan speed Low/Med/High
- 2: Switch light on/off
- 3: Stop fan
- 4: Indicator light
- 5: Fan Timer (1H-2H-4H-8H)
Wiring Diagram
Disconnect power before wiring.
Figure 1
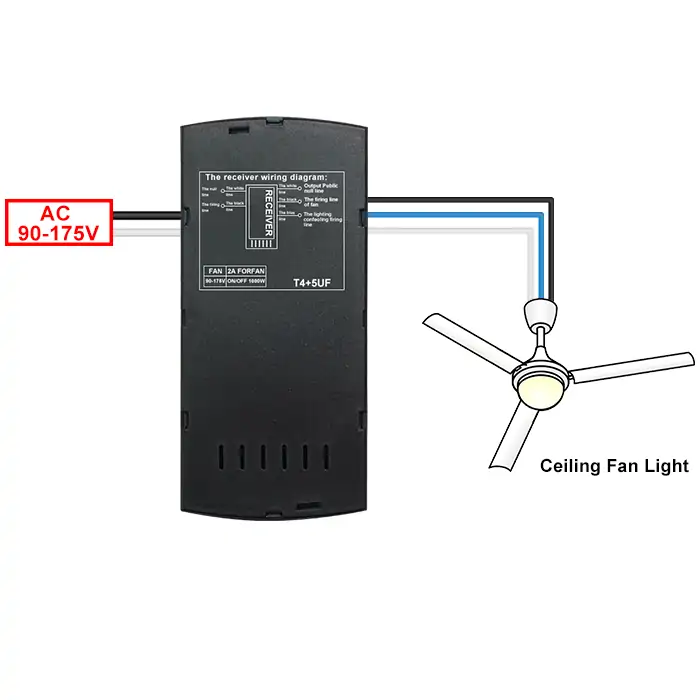
Figure 1: Wiring diagram for AC ceiling fan light
- Load: AC ceiling fan light
- Input voltage: AC 90V-175V
Function description and setting method
NOTE
- This product is intended for use only with AC motor ceiling fans and fan-lights; it is not compatible with DC motor fans or fan-lights.
- After successful pairing, the receiver stays linked to the transmitter even if power is lost and then restored.
- The following operations must be performed using QIACHIP-brand remote controls (transmitters) and controllers (receivers); compatibility with products of other brands cannot be guaranteed.
(1) Pairing
After completing this operation:
- Can use the remote control to turn the fan or fan-with-light on or off, and switch freely between any of the three fan speed levels.
- Can set a timed shutdown for 1H/2H/4H/8H. (This timer function applies only to the fan, not the light.)
How to Pair
Step 1
Power off the receiver, then power it back on (restart).
Step 2
Within 5 seconds of powering on the receiver, simultaneously press and hold the remote control "LIGHT ON/OFF" and "HI" buttons until the controller beeps three times, which indicates successful pairing.
(2) Unpairing
After completing this operation:
- FLC05-E110V receiver is unpaired, all previously paired transmitters lose control of it.
How to Unpair
Step 1
Power off the receiver, then power it back on (restart).
Step 2
Within 5 seconds of powering on the receiver, simultaneously press and hold the remote control "STOP" and "2H" buttons until the controller beeps once, which indicates the completion of the unpairing.
(3) Disable Buzzer
After completing this operation:
- The buzzer is turned off, and when the remote control button is pressed, the receiver will no longer emit a beep.
How to Disable Buzzer
Step 1
Power off the receiver, then power it back on (restart).
Step 2
Within 5 seconds of powering on the receiver, press and hold the remote control "STOP" button until the controller beeps three times, at which point the buzzer will be turned off.
(4) Enable Buzzer
After completing this operation:
- The buzzer is turned on, and when the remote control button is pressed, the receiver will emit a beep.
How to Enable Buzzer
Step 1
Power off the receiver, then power it back on (restart).
Step 2
Within 5 seconds of powering on the receiver, press and hold the remote control "STOP" button until the controller beeps twice, at which point the buzzer will be turned on.
Electrical characteristics
| Parameter | Value |
|---|---|
| Input voltage | AC 90-175V |
| RF frequency | 433.92MHz |
| Rated Load | <300W Ceiling Fan / <200W LED Light |
| Capacitors | T4+5 µF |
| Standby Power Consumption | <0.5W |
| Applicable Devices | AC motor ceiling fans and fan-lights |
| Working temperature | -20°C to 80°C |
| Receiver Size | 115x53x25mm |
| Remote Control Size | 136x50x18mm |
Warning
- L and N wires must not be reversed.
- When using wireless electronic devices, avoid proximity to metal objects, large electronic equipment, electromagnetic fields, and other sources of strong interference
Frequently Asked Questions (Q&A)
Question 1: After installing the ceiling fan light controller, the fan is too fast on LOW, MED, and HI. How to reduce the fan speed?
Answer:
The fan motor has a running capacitor, and the controller has its own capacitor too. The two capacitors together make the fan too fast. Follow these steps to reduce the fan speed:
- Use a 0.8-1μF, 450V CBB61 fan capacitor.
- Connect it in series with the wire between the controller FAN terminal and the ceiling fan.
After these steps, the fan runs slower on LOW, MED, and HI.
Question 2: After installing the ceiling fan light controller, LOW, MED, and HI are almost the same. How to make the difference between the speeds clearer?
Answer:
First check whether the original speed control of the ceiling fan (pull chain, wall speed controller or rotary knob) is at a low or medium setting. Move it to the highest setting and test again. After that, use only the remote control to change the fan speed, and do not touch the original speed control again. If your ceiling fan has only one switch and no speed control, you can skip this step.
If the three speeds are still almost the same after moving it to the highest setting, this ceiling fan is not compatible with this ceiling fan light controller.
Question 3: Why does the fan run at the same speed on LOW, MED, and HI after I install the ceiling fan light controller?
Answer:
If the fan runs at top speed on all three settings, the low-speed and medium-speed parts are not working. The usual cause is a broken speed capacitor inside the controller, and you need to replace the ceiling fan light controller.
If all three speeds are the same and the fan runs slower than before, first check whether the original speed control of the ceiling fan (pull chain, wall speed controller or rotary knob) is at a low or medium setting. Move it to the highest setting and test again. If the fan is still slow at the highest setting, the ceiling fan motor can no longer run properly because its running capacitor has aged, and you need to repair the ceiling fan.
Question 4: After installing the ceiling fan light controller, the LOW speed does not work. What should I do?
Answer:
First check whether the original speed control of the ceiling fan (pull chain, wall speed controller or rotary knob) is at a low or medium setting. Move it to the highest setting, then press the low speed button on the remote control again. If low speed works again, use only the remote control to change the fan speed from now on, and do not touch the original speed control again.
If low speed still does not run, turn off the power and spin the fan blades by hand. If the blades feel stiff and do not turn, the motor is too hard to turn (common on old fans), and you need to repair the ceiling fan. If the blades turn smoothly but low speed still does not run, the low-speed part inside the controller is broken, and you need to replace the ceiling fan light controller.
Question 5: With this controller, can I turn off the fan without turning off the light, or turn off the light without turning off the fan?
Answer:
Yes. You can turn off the fan and leave the light on, and you can also turn off the light and leave the fan on. On the remote control, the light and the fan use separate buttons:
- LIGHT button: turns the light on and off. It does not change the fan.
- STOP button: stops the fan. It does not change the light.
- LOW/MED/HI buttons: change the fan speed. They do not change the light.
The timer buttons (1H/2H/4H/8H) control the fan. They do not turn off the light.
Question 6: With this controller, pressing the light button also makes the fan spin, and pressing a speed button also turns on the light. What is the cause?
Answer:
Inside the controller, the light and the fan are two separate circuits, so normally they do not affect each other.
If this happens on a new installation, first match each wire to the name on its terminal. Check carefully whether the light wire and the fan wire are reversed or crossed:
- L-IN: the live wire from the power supply.
- N-IN: the neutral wire from the power supply.
- FAN: the live wire to the fan.
- LIGHT: the live wire to the light.
- COM: the shared neutral wire.
If the wires are correct and the problem is still there, the controller is broken inside. If the problem starts after some time of use, the controller is broken inside too, and the light and the fan affect each other inside the controller. You need to replace the controller.
Question 7: After a power outage, the ceiling fan light turns on by itself. What is the cause?
Answer:
Yes, this is normal. Every time you switch the power on, the controller beeps once and then turns the light on. The product always does this. You cannot change it. This lets you turn the light on and off with the power switch.
Question 8: Why does the ceiling fan still turn very slowly after I turn off the light or the fan with the remote?
Answer:
First check whether an air vent is blowing on the ceiling fan and pushing the blades. If no air vent is blowing on it, this ceiling fan is not fully compatible with the ceiling fan light controller. To stop the blades completely, turn off the wall switch, or try a different ceiling fan light controller.
Question 9: How to turn off the beep of the ceiling fan light controller?
Answer:
Steps to turn off the beep:
- Switch off the power, wait 10 seconds, then switch the power on again.
- Within 5 seconds after the power is on, press and hold the STOP button on the remote control.
- When you hear 3 beeps from the ceiling fan light controller, the beep is turned off.
If you press the button after 5 seconds, this does not turn off the beep. Switch off the power and switch it on again, then start again from step 1. To turn the beep back on: repeat the same steps above.
Question 10: How many beeps does the ceiling fan light controller make when the power is switched on? After I turn off the beep, why does it still beep when the power is switched on?
Answer:
One beep when you switch the power on is normal. Every time you switch the power on, the controller beeps once and then turns the light on. The product always does this, and you cannot turn off this beep or stop the light from turning on. When you turn off the beep, you turn off the beep for the remote buttons, so you hear no beep when you press a remote button, but the controller still beeps once when you switch the power on.
Question 11: After using this controller, I hear a humming sound, or the noise seems louder. Is this normal?
Answer:
Yes. A small hum at low and medium speed is normal, because at these speeds the motor does not get full power. The hum is louder at low speed, and high speed is usually the quietest because the motor gets full power. A very loud hum, a knocking sound, or a sound that gets louder as the fan runs faster is not normal. You need to repair the ceiling fan, or you need to replace the controller.
Question 12: How to set the original speed switch and light switch before installing the ceiling fan light controller?
Answer:
Before you install the ceiling fan light controller, move the original speed control to the highest setting, and leave the original light switch on. After you install it, do not touch them again, and use the remote control for the fan speed and the light. Do this according to your ceiling fan type:
- Pull chain: pull the chain to the setting where the fan runs fastest.
- Wall switch or wall speed controller: move the switch or slider to the highest setting.
- Rotary knob: turn the knob to the maximum.
- If your ceiling fan has only one switch and no speed control, no adjustment is needed.
Question 13: Can this ceiling fan light controller work with any ceiling fan? Which ceiling fans cannot use it?
Answer:
No, not all ceiling fans can use it. This product works with ceiling fans and ceiling fan lights that have an AC motor and three speeds. These ceiling fans cannot use it:
- Ceiling fans with a DC motor.
- Ceiling fans with six speeds, or speed control with no fixed steps.
- Ceiling fans with more than 2 wires from the motor.
- Ceiling fans with a wire that reverses the fan direction.
Question 14: Can this controller reverse the ceiling fan and change the airflow direction?
Answer:
No. This product cannot control the fan direction, and there is no button for it on the remote control.
Question 15: Can I dim the light with this controller? Can it work with RGB lights?
Answer:
No. The light can be on or off. You cannot dim it, and it does not work with RGB lights. If your original receiver had a dimming function, you will lose dimming after you change to this product.
Question 16: The ceiling fan light turns on by itself when I switch the power on. Can I make the light stay off instead?
Answer:
No. This product turns the light on when you switch the power on. The product always does this. You cannot change it. This lets you turn the light on and off with the power switch.
Question 17: Can this controller work with a 120V, 50W chandelier light?
Answer:
Yes. The maximum light load is 200W (LED), so 50W is within range. The 110V version accepts an input voltage from AC 90V to 175V, so 120V is within range.