QIACHIP KR2402A Instruction Manual DC 5V-60V 433MHz RF Remote Control Switch 2-CH Relay Receiver
Version: V1.0
Last Updated: 2025-06-24
Model: KR2402A
Product Size
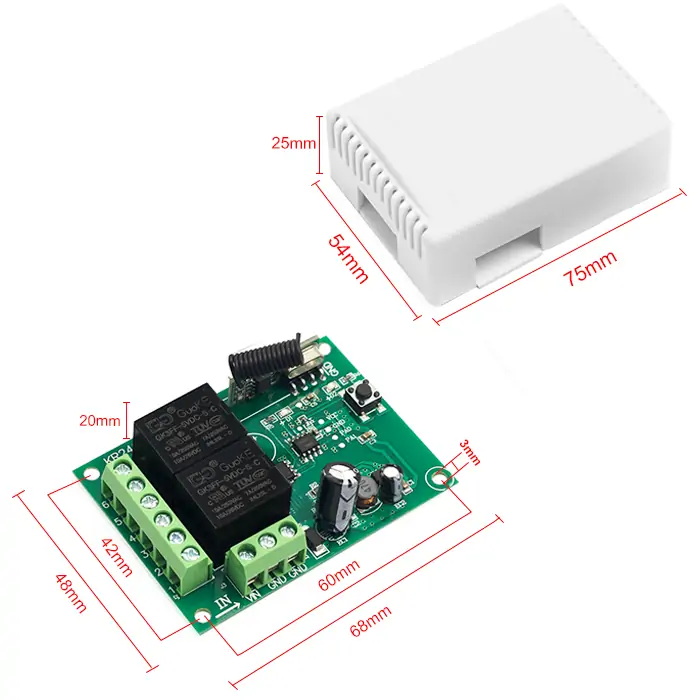
- Receiver Length (L) × Width (W) × Height (H): 68mm × 48mm × 20mm
- Housing Length (L) × Width (W) × Height (H): 75mm × 54mm × 25mm
- Receiver hole horizontal spacing: 60mm; Vertical spacing: 42mm; Hole Diameter: Ø5mm
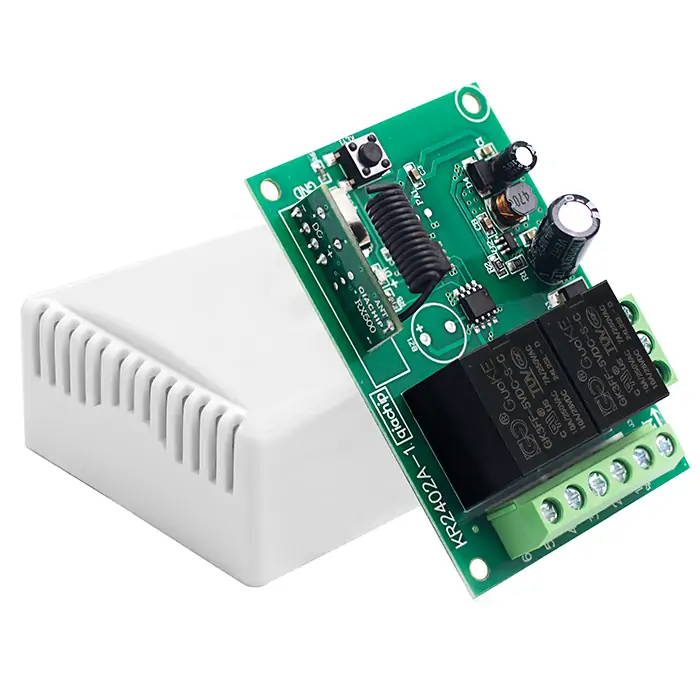
Component description

- 1: Learning button
- 2: Indicator light
- 3: Antenna
- +V: Positive input terminal
- -V: Negative input terminal
- NO1: Normally open terminal of relay1
- COM1: Common terminal of relay1
- NC1: Normally closed terminal of relay1
- NO2: Normally open terminal of relay2
- COM2: Common terminal of relay2
- NC2: Normally closed terminal of relay2
Wiring diagram
Disconnect power before wiring.
Figure 1
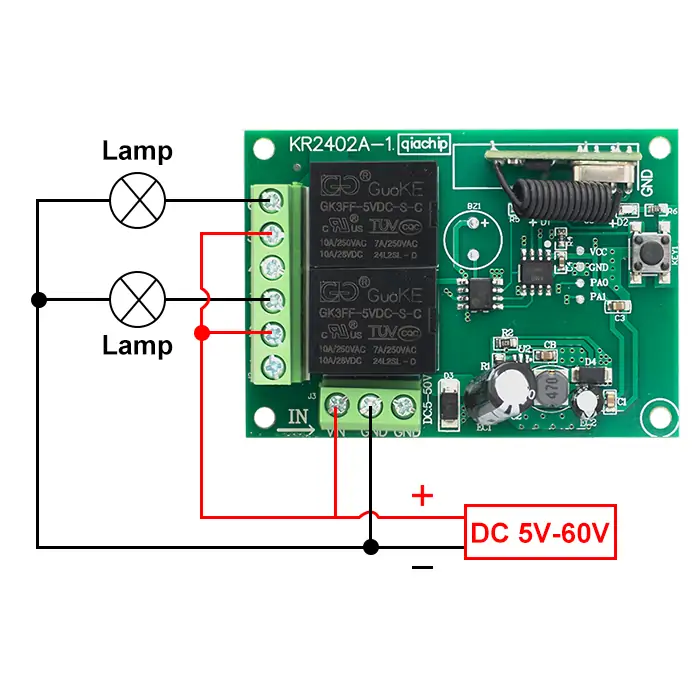
Figure 1: Wiring diagram for lamps
-
Load: lamps
-
Input Power: DC 5V-60V
Figure 2
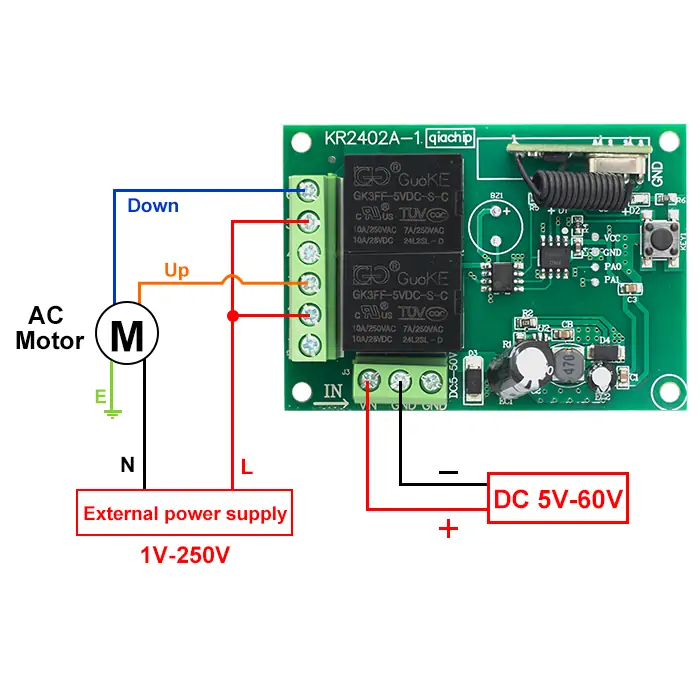
Figure 2: Wiring diagram for AC motors
- Load: AC motors
- Input Power: DC 5V-60V
- External power supply: 1V-250V
Figure 3
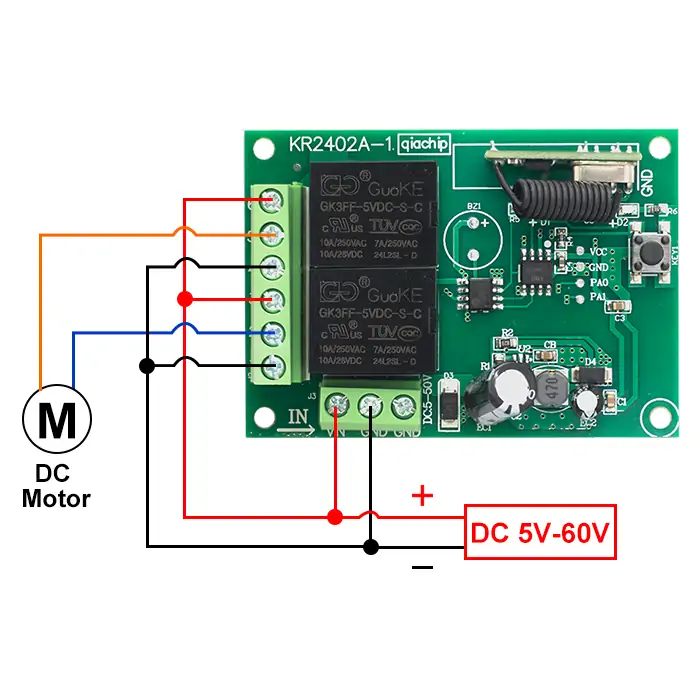
Figure 3: Wiring diagram for DC motors
- Load: DC motors
- Input Power: DC 5V-60V
Function description and setting method
(1) Momentary mode; (2) Toggle mode; (3) Latching mode; (4) Reset function.
NOTE
- When you use the first and second working modes, a remote control with at least two buttons is required.
- When you use the third working mode, a remote control with at least three buttons is required.
- When pairing a second remote, you don't need to press the button on the receiver 8 times again to reset it.
- Once the receiver and transmitter are paired and a working mode is selected, the receiver will retain this mode even if powered off and on again.
- The following working modes require the use of QIACHIP brand remote controls (transmitters) and controllers (receivers/wireless remote control switches). Compatibility with other brands is not guaranteed
(1) Momentary mode
In this mode:
- Press and hold the remote control button (such as A), and the corresponding relay on the receiver is turned on.
- Release the remote control button (such as A), and the corresponding relay on the receiver will turn off.
How to set momentary mode
NOTE
- The KR2402 can only be properly set up after being successfully paired with two different buttons on the remote control.
Step 1
Click the learning button of the receiver once. The indicator light on the receiver turns off and the receiver enters the setting state.
Step 2
Press the button on the remote control (such as A) once. The indicator light on the receiver will flash and then turns off.
Step 3
After the indicator light goes out, press another button (such as B) on the same remote control. The indicator light on the receiver will flash and then turn on. The momentary mode is set successfully.
(2) Toggle mode
In this mode:
- Press the remote control button (such as A), and the corresponding relay on the receiver will turn on.
- Press the remote control button (such as A) again, and the corresponding relay on the receiver will turn off.
How to set toggle mode
NOTE
- The KR2402 can only be properly set up after being successfully paired with two different buttons on the remote control.
Step 1
Click the learning button of the receiver twice. The indicator light on the receiver turns off, and the receiver enters the setting state.
Step 2
Press the button on the remote control (such as A) once. The indicator light on the receiver will flash and then turns off.
Step 3
After the indicator light goes out, press another button (such as B) on the same remote control. The indicator light on the receiver will flash and then turn on. The toggle mode is set successfully.
(3) Latching mode
In this mode:
- Press the remote control button (such as A), and the corresponding receiver’s relay A is turned on.
- Press the remote control button (such as B), and the receiver’s relay B is turned on, and the receiver’s relay A is turned off.
How to set latching mode
NOTE
- The KR2402 can only be properly set up after being successfully paired with two different buttons on the remote control.
Step 1
Click the learning button of the receiver three times. The indicator light on the receiver turns off, and the receiver enters the setting state.
Step 2
Press the button on the remote control (such as A) once. The indicator light on the receiver will flash and then turns off.
Step 3
After the indicator light goes out, press another button (such as B) on the same remote control. The indicator light on the receiver will flash and then turn on. The latching mode is set successfully.
(4) Reset function
- When the KR2402A receiver is reset, all paired transmitters will be unpaired and can no longer control the receiver.
How to Reset
Click the learning button on the receiver 8 times. The reset is complete when the indicator light flashes and then turns off.
Electrical characteristics
| Parameter | Value |
|---|---|
| Input voltage | DC 5-60V |
| RF frequency | 433.92MHz |
| Standby current | 8.5 mA |
| Rated Load | Max 1100W |
| Receiver sensitivity | -108dBm |
| Operation mode | Momentary mode/Toggle mode/Latching mode |
| Working temperature | -10℃~70℃ |
| Size | 68x48x18mm |
Warning
- The positive and negative terminal wires must not be reversed
- When using wireless electronic devices, avoid proximity to metal objects, large electronic equipment, electromagnetic fields, and other sources of strong interference
Frequently Asked Questions(Q&A)
Question 1: Why can my remote control Relay 1 but not Relay 2?
Answer:
The most common reason is that Relay 2 has not been paired with a remote button yet.
KR2402A has two relay channels. Pairing one button only sets one relay channel. To control Relay 2, you need to pair another remote button in the same learning flow.
For Momentary mode:
- Press the Learning button 1 time.
- Press the button for Relay 1 and wait until the indicator light flashes and turns off.
- Press the button for Relay 2 and wait until the indicator light flashes and turns on.
If only Relay 1 works, reset the receiver and pair both buttons again.
Question 2: Why do both A and B buttons control Relay 1 only after KR2402A Momentary pairing?
Answer:
This is usually a pairing issue, not a defective receiver.
Re-pair the receiver with the steps below to fix it:
- Press the Learning button 8 times to reset.
- Press the Learning button 1 time for Momentary mode.
- Press button A and wait until the indicator light flashes and turns off.
- Press button B and wait until the indicator light flashes and turns on.
Do not stop after pairing only button A. KR2402A needs both buttons to finish the 2-channel setup.
Question 3: What is the difference between Momentary, Toggle, and Latching mode?
Answer:
KR2402A has three working modes, and each mode changes how the relay responds to the remote button.
- Momentary mode: the relay turns on only while you hold the button. When you release the button, the relay turns off.
- Toggle mode: press the same button once to turn the relay on, and press it again to turn the relay off.
- Latching mode: one button turns Relay 1 on, and another button turns Relay 2 on while Relay 1 turns off.
Use Momentary mode for hold-to-run control, Toggle mode for simple on / off control, and Latching mode when Relay 1 and Relay 2 should not stay on at the same time.
Question 4: Do the two relay channels trigger at the same time or one by one?
Answer:
No, KR2402A does not have an automatic sequence mode.
The two relay channels are normally controlled separately by different remote buttons. In Momentary mode or Toggle mode, button A can control Relay 1 and button B can control Relay 2.
Question 5: How do I set two remotes to control Relay 1 and Relay 2 on KR2402A?
Answer:
To set two remotes to control Relay 1 and Relay 2, pair one button from the first remote to Relay 1 and one button from the second remote to Relay 2 in the same learning flow.
Example for Toggle mode:
- Press the Learning button on the receiver 2 times.
- Wait until the indicator light turns off.
- Press the button on the first remote for Relay 1.
- Wait until the indicator light flashes and turns off.
- Press the button on the second remote for Relay 2.
- When the indicator light flashes and turns on, the setup is finished.
If the pairing is wrong, press the Learning button 8 times to reset. Reset will delete all paired remotes.
Question 6: Can I pair multiple remotes to channels A and B in Momentary mode?
Answer:
Yes. KR2402A can pair multiple remotes to channels A and B in Momentary mode.
For each new remote, pair both buttons in the Momentary learning flow. Do not pair only button A.
Do not press the Learning button 8 times unless you want to reset the receiver, because 8 presses delete all paired remotes.
Question 7: How do I use KR2402A Momentary mode to control a two-direction motor with button A and button B?
Answer:
Yes. You can use KR2402A Momentary mode for a two-direction motor with button A and button B.
Steps:
- Press the Learning button on the receiver 1 time.
- Wait until the indicator light turns off.
- Press button A on the remote.
- Wait until the indicator light flashes and turns off.
- Press button B on the remote.
- When the indicator light flashes and turns on, the setup is finished.
In Momentary mode, the relay turns on only while you hold the button. For a two-direction motor, both directions must not turn on at the same time.
If the motor system has a dedicated control input, trigger the control input with KR2402A instead of switching the motor power wires directly.
Question 8: Does the KR2402A relay stay on after power loss?
Answer:
No. The relay cannot stay on when the power is off.
KR2402A can remember the paired remote and working mode after power loss. But the relay state needs power. After power comes back, the next relay action depends on the mode and remote command.
Question 9: How should I wire KR2402A for my load?
Answer:
It depends on what load you want to control.
Use the wiring diagram that matches your load, such as a lamp, AC motor, or DC motor. Turn off power before wiring. KR2402A receiver input is DC 5V-60V through +V and -V. For relay output wiring, use the correct relay terminals: NO1 / COM1 / NC1 for Relay 1, and NO2 / COM2 / NC2 for Relay 2.
+V and -V power the KR2402A receiver itself. The relay terminals do not output power by themselves; they are dry contacts and work like switches for the load circuit you connect.
Question 10: Can one remote control two KR2402A receivers in Momentary mode and Toggle mode?
Answer:
Yes, it is possible, but we do not recommend it if the two KR2402A receivers are close to each other.
One remote sends the same RF signal. If both receivers are within range, both may receive the signal and operate. To avoid interference, keep the two receivers far enough apart so they are not in the same remote-control range, or use separate remotes.
Question 11: Can I add a signal amplifier to KR2402A to reach 100 meters?
Answer:
No, we do not recommend adding a signal amplifier to KR2402A.
KR2402A uses 433.92MHz remote control. To improve distance, fully extend the receiver antenna and keep it away from metal and motors. If you need about 100 meters, use a longer-range remote with an antenna instead of modifying the receiver.