Product FAQ
AC Controller
KR2202 FLC05-E110V FLC05-E220V
DC Controller
KR1201A KR1202-30R KR1202-V05 KR2402A
Wireless Receiver Module
RX480E-4 RX480E-4C RX480E-1A RX480E-868
AC Controller
KR2202
Question 01. Why can my remote control Relay 1 but not Relay 2 in KR2202 Momentary mode?
Answer:
Your pairing steps may be wrong, so your remote can only control Relay 1.
Pair the receiver again with the steps below:
- Press the receiver's Learning button 8 times to reset the receiver.
- Press the receiver's Learning button 1 time for Momentary mode.
- Press one button on the remote (such as A). Wait until the receiver's indicator light flashes, then turns off.
- Press another button on the remote (such as B). Wait until the receiver's indicator light flashes, then turns on.
This sets both relays in Momentary mode.
Question 02. Why do button A and button B both control Relay 1 after KR2202 Momentary pairing?
Answer:
Your pairing steps may be wrong, so button A and button B both control Relay 1.
Pair the receiver again with the steps below:
- Press the receiver's Learning button 8 times to reset the receiver.
- Press the receiver's Learning button 1 time for Momentary mode.
- Press button A on the remote. Wait until the receiver's indicator light flashes, then turns off.
- Press button B on the remote. Wait until the receiver's indicator light flashes, then turns on.
This sets button A for Relay 1 and button B for Relay 2 in Momentary mode.
Question 03. What is the difference between KR2202 Momentary, Toggle, and Latching modes?
Answer:
KR2202 has three working modes.
Momentary mode: the relay turns on while you hold the remote button. The relay turns off when you release it.
Toggle mode: press the remote button once, and the relay turns on. Press the same remote button again, and the relay turns off.
Latching mode: press remote button A, and Relay 1 turns on. Press remote button B, and Relay 2 turns on while Relay 1 turns off. Press STOP, and the active relay turns off.
Use Momentary mode for hold-to-run control. Use Toggle mode for on / off control. Use Latching mode when two directions must not turn on at the same time.
Question 04. Can KR2202 trigger Relay 1 and Relay 2 one by one automatically?
Answer:
No, KR2202 does not have an automatic sequence mode.
Relay 1 and Relay 2 are controlled by paired remote buttons. In Momentary mode or Toggle mode, remote button A can control Relay 1, and remote button B can control Relay 2.
Question 05. How do I set two remotes to control Relay 1 and Relay 2 on KR2202?
Answer:
Pair one button on each remote in the same setup. The first button you pair controls Relay 1. The second button you pair controls Relay 2.
Example for Toggle mode:
- Press the receiver's Learning button 2 times for Toggle mode. Wait until the receiver's indicator light turns off.
- Press a button on the first remote. Wait until the receiver's indicator light flashes, then turns off.
- Press a button on the second remote. Wait until the receiver's indicator light flashes, then turns on.
Question 06. Can I pair multiple remotes to channels A and B in Momentary mode?
Answer:
Yes, KR2202 can pair multiple remotes to channels A and B in Momentary mode.
For each new remote, pair button A and button B in the same Momentary setup. Do not pair button A alone.
Press the receiver's Learning button 8 times only if you want to reset the receiver. Reset deletes all paired remotes.
Question 07. Why does my 3-button UP / STOP / DOWN remote not work for motor control in Toggle mode?
Answer:
Toggle mode is not the right mode for UP / STOP / DOWN motor control. Use Latching mode instead.
Pair UP and DOWN in the same Latching mode setup:
- Press the receiver's Learning button 8 times to reset the receiver.
- Press the receiver's Learning button 3 times for Latching mode.
- Press the UP button. Wait until the receiver's indicator light flashes, then turns off.
- Press the DOWN button. Wait until the receiver's indicator light flashes, then turns on.
After this setup:
UP: the motor runs up. DOWN: the motor runs down and UP turns off. STOP: the active relay turns off.
For motor control, the up and down directions must not turn on at the same time.
Question 08. How do I use KR2202 Momentary mode to control a two-direction motor with button A and button B?
Answer:
Use KR2202 Momentary mode through the motor controller control inputs, not by connecting KR2202 directly to the motor wires.
Pair the receiver with the steps below:
- Press the receiver's Learning button 1 time for Momentary mode. Wait until the receiver's indicator light turns off.
- Press remote button A for one motor direction. Wait until the receiver's indicator light flashes, then turns off.
- Press remote button B for the other motor direction. Wait until the receiver's indicator light flashes, then turns on.
Button A: one motor direction runs while you hold button A. Button B: the other motor direction runs while you hold button B.
The motor controller must prevent both directions from running at the same time.
Question 09. Does the KR2202 relay stay on after power loss?
Answer:
No, the relay cannot stay on when the power is off.
KR2202 can remember the paired remote and working mode after power loss. The relay state still needs power. After power comes back, the next relay action depends on the mode and remote command.
Question 10. Is the KR2202 receiver powered by 220V, or are the relay contacts rated for 220V?
Answer:
Yes, the KR2202 receiver can be powered by 220V AC. No, the relay contacts do not output 220V by themselves.
The relay output is a dry contact. This means the relay output works like a switch. It does not output power by itself.
Relay output terminals: NO / COM / NC.
Question 11. Is KR2202 compatible with 230V AC?
Answer:
Yes, KR2202 can work with 230V AC power.
Its input voltage range is AC 85V-250V, so 230V AC is within the supported power range.
Question 12. How should I wire KR2202 for my load?
Answer:
It depends on what load you want to control.
Use the KR2202 wiring diagram that matches your load. Turn off power before wiring.
L / N: receiver power input, AC 85V-250V.
Relay output terminals: NO / COM / NC.
Rated load: Max 1100W.
The relay output is a dry contact. This means the relay output works like a switch. It does not output power by itself.
Question 13. Can one KR2202 remote control two garage door motors?
Answer:
It depends on what you mean by garage door motor.
If you mean a garage door opener or motor controller with a compatible control input, yes. KR2202 can trigger that input.
Do not use KR2202 to drive bare garage door motors directly. KR2202 is a relay receiver, not a motor controller.
Question 14. Can KR2202 control a winch raise and lower motor?
Answer:
It depends on the winch control method.
If the winch controller has compatible raise and lower control inputs, KR2202 can trigger those inputs.
Connect KR2202 to the winch controller input or manual switch terminals.
Do not connect KR2202 directly to the winch motor wires.
Question 15. Is KR2202 suitable for a roller shutter or garage shutter motor?
Answer:
Yes, if the shutter motor or controller matches the KR2202 power and load limits.
Key points:
- KR2202 input voltage is AC 85V-250V.
- The load must stay within Max 1100W.
- If the shutter has a wall switch input, connect the KR2202 relay output to that input.
Question 16. Can KR2202 use button A and button B for gate open and close in Momentary mode?
Answer:
Yes, if your gate controller has dry contact OPEN and CLOSE inputs.
Use Relay 1 for OPEN and Relay 2 for CLOSE. Set KR2202 to Momentary mode.
Connect KR2202 only to the gate controller dry contact input terminals.
Question 17. How do I identify a 3-wire roller shutter motor? Does KR2202 stop at the end position?
Answer:
For the 3-wire motor: check the motor label or manual before wiring.
A 3-wire shutter motor may be Live / Neutral / Ground, or it may be Common / Up / Down.
For the end position: no. KR2202 does not stop the shutter at the end position by itself.
KR2202 only turns its relay on and off.
Question 18. Why does KR2202 work with no load but fail when I connect a pool cover motor?
Answer:
If KR2202 works with no load but fails with a pool cover motor, the cause is more likely the motor load or motor control method.
The two most likely reasons are:
-
The motor starting current is too high. A motor needs more current when it starts than when it runs. Even if the running power is under Max 1100W, the starting current may still be too high for KR2202. Do not connect KR2202 directly to the pool cover motor wires. Use a motor controller or contactor for the motor circuit.
-
The pool cover controller may need its own control input. KR2202 is a relay receiver, not a motor controller. If the pool cover controller has a wall switch input or control input, connect KR2202 relay output COM and NO to that input.
Check the motor label or manual for starting current and control input type. If you are not sure, ask an electrician before wiring.
Question 19. Can one remote control two KR2202 receivers in Momentary mode and Toggle mode?
Answer:
Yes, it is possible, but we do not recommend it if the two receivers are close to each other.
One remote sends the same RF signal. If both receivers are within the same remote-control range, both may receive the signal and operate.
Momentary mode and Toggle mode do not separate the RF signal. To avoid interference, keep the two receivers far enough apart, or use separate remotes.
Question 20. Can I add a signal amplifier to KR2202 to reach 100 meters?
Answer:
No, we do not recommend adding a signal amplifier to the receiver.
Changing the receiver may damage KR2202 or make the remote signal unstable.
To improve remote-control range, fully extend the receiver antenna. Keep the receiver antenna away from metal parts and motor wires.
If you need about 100 meters, use a longer-range remote with an antenna.
FLC05-E110V
FLC05-E110V
Question 01. After installing the ceiling fan light controller, the fan is too fast on LOW, MED, and HI. How to reduce the fan speed?
Answer:
The fan motor has a running capacitor, and the controller has its own capacitor too. The two capacitors together make the fan too fast. Follow these steps to reduce the fan speed:
- Use a 0.8-1μF, 450V CBB61 fan capacitor.
- Connect it in series with the wire between the controller FAN terminal and the ceiling fan.
After these steps, the fan runs slower on LOW, MED, and HI.
Question 02. After installing the ceiling fan light controller, LOW, MED, and HI are almost the same. How to make the difference between the speeds clearer?
Answer:
First check whether the original speed control of the ceiling fan (pull chain, wall speed controller or rotary knob) is at a low or medium setting. Move it to the highest setting and test again. After that, use only the remote control to change the fan speed, and do not touch the original speed control again. If your ceiling fan has only one switch and no speed control, you can skip this step.
If the three speeds are still almost the same after moving it to the highest setting, this ceiling fan is not compatible with this ceiling fan light controller.
Question 03. Why does the fan run at the same speed on LOW, MED, and HI after I install the ceiling fan light controller?
Answer:
If the fan runs at top speed on all three settings, the low-speed and medium-speed parts are not working. The usual cause is a broken speed capacitor inside the controller, and you need to replace the ceiling fan light controller.
If all three speeds are the same and the fan runs slower than before, first check whether the original speed control of the ceiling fan (pull chain, wall speed controller or rotary knob) is at a low or medium setting. Move it to the highest setting and test again. If the fan is still slow at the highest setting, the ceiling fan motor can no longer run properly because its running capacitor has aged, and you need to repair the ceiling fan.
Question 04. After installing the ceiling fan light controller, the LOW speed does not work. What should I do?
Answer:
First check whether the original speed control of the ceiling fan (pull chain, wall speed controller or rotary knob) is at a low or medium setting. Move it to the highest setting, then press the low speed button on the remote control again. If low speed works again, use only the remote control to change the fan speed from now on, and do not touch the original speed control again.
If low speed still does not run, turn off the power and spin the fan blades by hand. If the blades feel stiff and do not turn, the motor is too hard to turn (common on old fans), and you need to repair the ceiling fan. If the blades turn smoothly but low speed still does not run, the low-speed part inside the controller is broken, and you need to replace the ceiling fan light controller.
Question 05. With this controller, can I turn off the fan without turning off the light, or turn off the light without turning off the fan?
Answer:
Yes. You can turn off the fan and leave the light on, and you can also turn off the light and leave the fan on. On the remote control, the light and the fan use separate buttons:
- LIGHT button: turns the light on and off. It does not change the fan.
- STOP button: stops the fan. It does not change the light.
- LOW/MED/HI buttons: change the fan speed. They do not change the light.
The timer buttons (1H/2H/4H/8H) control the fan. They do not turn off the light.
Question 06. With this controller, pressing the light button also makes the fan spin, and pressing a speed button also turns on the light. What is the cause?
Answer:
Inside the controller, the light and the fan are two separate circuits, so normally they do not affect each other.
If this happens on a new installation, first match each wire to the name on its terminal. Check carefully whether the light wire and the fan wire are reversed or crossed:
- L-IN: the live wire from the power supply.
- N-IN: the neutral wire from the power supply.
- FAN: the live wire to the fan.
- LIGHT: the live wire to the light.
- COM: the shared neutral wire.
If the wires are correct and the problem is still there, the controller is broken inside. If the problem starts after some time of use, the controller is broken inside too, and the light and the fan affect each other inside the controller. You need to replace the controller.
Question 07. After a power outage, the ceiling fan light turns on by itself. What is the cause?
Answer:
Yes, this is normal. Every time you switch the power on, the controller beeps once and then turns the light on. The product always does this. You cannot change it. This lets you turn the light on and off with the power switch.
Question 08. Why does the ceiling fan still turn very slowly after I turn off the light or the fan with the remote?
Answer:
First check whether an air vent is blowing on the ceiling fan and pushing the blades. If no air vent is blowing on it, this ceiling fan is not fully compatible with the ceiling fan light controller. To stop the blades completely, turn off the wall switch, or try a different ceiling fan light controller.
Question 09. How to turn off the beep of the ceiling fan light controller?
Answer:
Steps to turn off the beep:
- Switch off the power, wait 10 seconds, then switch the power on again.
- Within 5 seconds after the power is on, press and hold the STOP button on the remote control.
- When you hear 3 beeps from the ceiling fan light controller, the beep is turned off.
If you press the button after 5 seconds, this does not turn off the beep. Switch off the power and switch it on again, then start again from step 1. To turn the beep back on: repeat the same steps above.
Question 10. How many beeps does the ceiling fan light controller make when the power is switched on? After I turn off the beep, why does it still beep when the power is switched on?
Answer:
One beep when you switch the power on is normal. Every time you switch the power on, the controller beeps once and then turns the light on. The product always does this, and you cannot turn off this beep or stop the light from turning on. When you turn off the beep, you turn off the beep for the remote buttons, so you hear no beep when you press a remote button, but the controller still beeps once when you switch the power on.
Question 11. After using this controller, I hear a humming sound, or the noise seems louder. Is this normal?
Answer:
Yes. A small hum at low and medium speed is normal, because at these speeds the motor does not get full power. The hum is louder at low speed, and high speed is usually the quietest because the motor gets full power. A very loud hum, a knocking sound, or a sound that gets louder as the fan runs faster is not normal. You need to repair the ceiling fan, or you need to replace the controller.
Question 12. How to set the original speed switch and light switch before installing the ceiling fan light controller?
Answer:
Before you install the ceiling fan light controller, move the original speed control to the highest setting, and leave the original light switch on. After you install it, do not touch them again, and use the remote control for the fan speed and the light. Do this according to your ceiling fan type:
- Pull chain: pull the chain to the setting where the fan runs fastest.
- Wall switch or wall speed controller: move the switch or slider to the highest setting.
- Rotary knob: turn the knob to the maximum.
- If your ceiling fan has only one switch and no speed control, no adjustment is needed.
Question 13. Can this ceiling fan light controller work with any ceiling fan? Which ceiling fans cannot use it?
Answer:
No, not all ceiling fans can use it. This product works with ceiling fans and ceiling fan lights that have an AC motor and three speeds. These ceiling fans cannot use it:
- Ceiling fans with a DC motor.
- Ceiling fans with six speeds, or speed control with no fixed steps.
- Ceiling fans with more than 2 wires from the motor.
- Ceiling fans with a wire that reverses the fan direction.
Question 14. Can this controller reverse the ceiling fan and change the airflow direction?
Answer:
No. This product cannot control the fan direction, and there is no button for it on the remote control.
Question 15. Can I dim the light with this controller? Can it work with RGB lights?
Answer:
No. The light can be on or off. You cannot dim it, and it does not work with RGB lights. If your original receiver had a dimming function, you will lose dimming after you change to this product.
Question 16. The ceiling fan light turns on by itself when I switch the power on. Can I make the light stay off instead?
Answer:
No. This product turns the light on when you switch the power on. The product always does this. You cannot change it. This lets you turn the light on and off with the power switch.
Question 17. Can this controller work with a 120V, 50W chandelier light?
Answer:
Yes. The maximum light load is 200W (LED), so 50W is within range. The 110V version accepts an input voltage from AC 90V to 175V, so 120V is within range.
FLC05-E220V
FLC05-E220V
Question 01. After installing the ceiling fan light controller, the fan is too fast on LOW, MED, and HI. How to reduce the fan speed?
Answer:
The fan motor has a running capacitor, and the controller has its own capacitor too. The two capacitors together make the fan too fast. Follow these steps to reduce the fan speed:
- Use a 0.8-1μF, 450V CBB61 fan capacitor.
- Connect it in series with the wire between the controller FAN terminal and the ceiling fan.
After these steps, the fan runs slower on LOW, MED, and HI.
Question 02. After installing the ceiling fan light controller, LOW, MED, and HI are almost the same. How to make the difference between the speeds clearer?
Answer:
First check whether the original speed control of the ceiling fan (pull chain, wall speed controller or rotary knob) is at a low or medium setting. Move it to the highest setting and test again. After that, use only the remote control to change the fan speed, and do not touch the original speed control again. If your ceiling fan has only one switch and no speed control, you can skip this step.
If the three speeds are still almost the same after moving it to the highest setting, this ceiling fan is not compatible with this ceiling fan light controller.
Question 03. Why does the fan run at the same speed on LOW, MED, and HI after I install the ceiling fan light controller?
Answer:
If the fan runs at top speed on all three settings, the low-speed and medium-speed parts are not working. The usual cause is a broken speed capacitor inside the controller, and you need to replace the ceiling fan light controller.
If all three speeds are the same and the fan runs slower than before, first check whether the original speed control of the ceiling fan (pull chain, wall speed controller or rotary knob) is at a low or medium setting. Move it to the highest setting and test again. If the fan is still slow at the highest setting, the ceiling fan motor can no longer run properly because its running capacitor has aged, and you need to repair the ceiling fan.
Question 04. After installing the ceiling fan light controller, the LOW speed does not work. What should I do?
Answer:
First check whether the original speed control of the ceiling fan (pull chain, wall speed controller or rotary knob) is at a low or medium setting. Move it to the highest setting, then press the low speed button on the remote control again. If low speed works again, use only the remote control to change the fan speed from now on, and do not touch the original speed control again.
If low speed still does not run, turn off the power and spin the fan blades by hand. If the blades feel stiff and do not turn, the motor is too hard to turn (common on old fans), and you need to repair the ceiling fan. If the blades turn smoothly but low speed still does not run, the low-speed part inside the controller is broken, and you need to replace the ceiling fan light controller.
Question 05. With this controller, can I turn off the fan without turning off the light, or turn off the light without turning off the fan?
Answer:
Yes. You can turn off the fan and leave the light on, and you can also turn off the light and leave the fan on. On the remote control, the light and the fan use separate buttons:
- LIGHT button: turns the light on and off. It does not change the fan.
- STOP button: stops the fan. It does not change the light.
- LOW/MED/HI buttons: change the fan speed. They do not change the light.
The timer buttons (1H/2H/4H/8H) control the fan. They do not turn off the light.
Question 06. With this controller, pressing the light button also makes the fan spin, and pressing a speed button also turns on the light. What is the cause?
Answer:
Inside the controller, the light and the fan are two separate circuits, so normally they do not affect each other.
If this happens on a new installation, first match each wire to the name on its terminal. Check carefully whether the light wire and the fan wire are reversed or crossed:
- L-IN: the live wire from the power supply.
- N-IN: the neutral wire from the power supply.
- FAN: the live wire to the fan.
- LIGHT: the live wire to the light.
- COM: the shared neutral wire.
If the wires are correct and the problem is still there, the controller is broken inside. If the problem starts after some time of use, the controller is broken inside too, and the light and the fan affect each other inside the controller. You need to replace the controller.
Question 07. After a power outage, the ceiling fan light turns on by itself. What is the cause?
Answer:
Yes, this is normal. Every time you switch the power on, the controller beeps once and then turns the light on. The product always does this. You cannot change it. This lets you turn the light on and off with the power switch.
Question 08. Why does the ceiling fan still turn very slowly after I turn off the light or the fan with the remote?
Answer:
First check whether an air vent is blowing on the ceiling fan and pushing the blades. If no air vent is blowing on it, this ceiling fan is not fully compatible with the ceiling fan light controller. To stop the blades completely, turn off the wall switch, or try a different ceiling fan light controller.
Question 09. How to turn off the beep of the ceiling fan light controller?
Answer:
Steps to turn off the beep:
- Switch off the power, wait 10 seconds, then switch the power on again.
- Within 5 seconds after the power is on, press and hold the STOP button on the remote control.
- When you hear 3 beeps from the ceiling fan light controller, the beep is turned off.
If you press the button after 5 seconds, this does not turn off the beep. Switch off the power and switch it on again, then start again from step 1. To turn the beep back on: repeat the same steps above.
Question 10. How many beeps does the ceiling fan light controller make when the power is switched on? After I turn off the beep, why does it still beep when the power is switched on?
Answer:
One beep when you switch the power on is normal. Every time you switch the power on, the controller beeps once and then turns the light on. The product always does this, and you cannot turn off this beep or stop the light from turning on. When you turn off the beep, you turn off the beep for the remote buttons, so you hear no beep when you press a remote button, but the controller still beeps once when you switch the power on.
Question 11. After using this controller, I hear a humming sound, or the noise seems louder. Is this normal?
Answer:
Yes. A small hum at low and medium speed is normal, because at these speeds the motor does not get full power. The hum is louder at low speed, and high speed is usually the quietest because the motor gets full power. A very loud hum, a knocking sound, or a sound that gets louder as the fan runs faster is not normal. You need to repair the ceiling fan, or you need to replace the controller.
Question 12. How to set the original speed switch and light switch before installing the ceiling fan light controller?
Answer:
Before you install the ceiling fan light controller, move the original speed control to the highest setting, and leave the original light switch on. After you install it, do not touch them again, and use the remote control for the fan speed and the light. Do this according to your ceiling fan type:
- Pull chain: pull the chain to the setting where the fan runs fastest.
- Wall switch or wall speed controller: move the switch or slider to the highest setting.
- Rotary knob: turn the knob to the maximum.
- If your ceiling fan has only one switch and no speed control, no adjustment is needed.
Question 13. Can this ceiling fan light controller work with any ceiling fan? Which ceiling fans cannot use it?
Answer:
No, not all ceiling fans can use it. This product works with ceiling fans and ceiling fan lights that have an AC motor and three speeds. These ceiling fans cannot use it:
- Ceiling fans with a DC motor.
- Ceiling fans with six speeds, or speed control with no fixed steps.
- Ceiling fans with more than 2 wires from the motor.
- Ceiling fans with a wire that reverses the fan direction.
Question 14. Can this controller reverse the ceiling fan and change the airflow direction?
Answer:
No. This product cannot control the fan direction, and there is no button for it on the remote control.
Question 15. Can I dim the light with this controller? Can it work with RGB lights?
Answer:
No. The light can be on or off. You cannot dim it, and it does not work with RGB lights. If your original receiver had a dimming function, you will lose dimming after you change to this product.
Question 16. The ceiling fan light turns on by itself when I switch the power on. Can I make the light stay off instead?
Answer:
No. This product turns the light on when you switch the power on. The product always does this. You cannot change it. This lets you turn the light on and off with the power switch.
Question 17. Can this controller work with a 220V, 50W chandelier light?
Answer:
Yes. The maximum light load is 200W (LED), so 50W is within range. The 220V version accepts an input voltage from AC 175V to 265V, so 220V is within range.
DC Controller
KR1201A
Question 01. Does KR1201A support Momentary mode?
Answer:
Yes, KR1201A supports Momentary mode.
Momentary mode: the relay turns on while you hold the remote button. The relay turns off when you release it.
KR1201A also supports Toggle mode, Latching mode, and Delay mode.
Question 02. In Momentary mode, what happens if the remote moves out of range while I hold the button?
Answer:
If the remote moves out of range, the relay turns off.
The receiver no longer gets the remote signal. This is the same as releasing the remote button.
Question 03. Which mode should I use to reduce battery consumption?
Answer:
Momentary mode may help reduce battery use.
The receiver still uses a small amount of power in standby. Momentary mode can reduce the active working time.
For longer operating time, use a large-capacity battery or a stable 12V DC power supply.
Question 04. Will KR1201A lose the paired remotes or working mode after power loss?
Answer:
No, KR1201A can remember the paired remotes and working mode after power loss.
The relay cannot stay on when the power is off.
After power comes back, the receiver works with the saved remotes and mode. Reset deletes the saved data.
Question 05. Does Toggle mode need to be set again after power loss?
Answer:
No, KR1201A does not need to be set again after power loss.
The receiver can remember Toggle mode after power loss.
Question 06. Can one KR1201A receiver work with more than one remote?
Answer:
Yes, one KR1201A receiver can work with multiple remotes.
Pair the first remote. Then pair each new remote the same way.
Each paired remote can control the same receiver.
Question 07. Can two remotes use the same working mode, such as Delay mode or Toggle mode?
Answer:
Yes, multiple remotes can use the same working mode.
Pair the remotes to the same receiver and set the working mode you need.
Question 08. Can KR1201A reverse a DC motor?
Answer:
No, KR1201A cannot reverse a DC motor.
KR1201A is a single-channel relay receiver. It can do simple on / off control.
DC motor reverse control needs polarity change. Use a two-channel relay receiver or a motor controller.
Question 09. Can button B reverse a motor?
Answer:
No, button B cannot reverse a motor with KR1201A.
KR1201A is a single-channel relay receiver. It cannot do forward and reverse motor control.
Use a two-channel controller for motor forward and reverse control.
Question 10. Can KR1201A control a servo motor?
Answer:
No, KR1201A is not made for servo motor control.
Servo motors need a signal-based servo controller.
Question 11. Can two KR1201A receivers control a DC motor left and right?
Answer:
No, two KR1201A receivers are not the right choice for DC motor left and right control.
DC motor direction control needs polarity change. Use a two-channel receiver or a motor controller.
Question 12. Can KR1201A be powered by AC power?
Answer:
No, do not power KR1201A with AC power.
KR1201A needs DC 12V input. If you need AC 110V or AC 220V control, choose a receiver made for that AC voltage.
Question 13. Can KR1201A control AC 220V home appliances?
Answer:
No, KR1201A is not the right choice for AC 220V home appliances.
KR1201A itself is a 12V DC receiver. Do not power it with AC 220V.
Use an AC 220V receiver instead. For example: KR2201 series.
Question 14. Can KR1201A and the load use the same power supply?
Answer:
Yes, but only if the voltage and current match both the receiver and the load.
Check that:
- receiver input voltage: DC 12V;
- load voltage;
- power supply output current.
Wrong voltage or not enough current can damage the device.
Question 15. Can a 5V version work with a 3.7V Li-ion / 18650 battery?
Answer:
No, a 3.7V battery is lower than the 5V receiver input.
Low voltage may make the receiver unstable, reduce range, or stop the receiver from working.
Use a proper 5V power source for a 5V receiver.
Question 16. What battery should I use for KR1201A?
Answer:
Use a 12V power source for KR1201A.
A 12V lithium battery is usually better than AA batteries.
AA batteries may work, but they have lower capacity and may run out fast. If the device stops working, check the battery first.
Question 17. Can a 9V battery power KR1201A?
Answer:
No, a 9V battery is not enough for KR1201A.
KR1201A needs 12V DC. A 9V battery may light the indicator, but it may not power the relay.
Use a proper 12V power source.
Question 18. Can two devices be connected using NO and NC?
Answer:
Yes, you can use NO and NC to connect two loads.
NO: normally open. NC: normally closed.
Connect one load through NO and another load through NC. When the relay changes, one load turns on and the other turns off.
Avoid short circuits.
Question 19. Can the negative line be connected to COM?
Answer:
Yes, the negative line can connect to COM in some DC circuits.
Only do this if you understand relay wiring.
The key rule: the circuit must not create a short circuit.
Question 20. Can KR1201A control two LED lights so that one is on while the other is off?
Answer:
Yes, KR1201A can control two LED lights so that one is on while the other is off.
Connect one LED through NO and the other LED through NC. When the relay changes, one LED turns on and the other turns off.
For more complex control, use a multi-channel relay receiver.
Question 21. What is the maximum remote-control distance?
Answer:
It depends on the remote model, antenna, environment, and interference.
Some remotes claim 2 miles or 3 km. Real-world distance is much lower, around 1 km or less.
Question 22. Can I connect an external antenna to KR1201A?
Answer:
Yes, but the external antenna must match the module specs.
KR1201A has an antenna on the module. A wrong antenna may not improve distance and may make the module work poorly.
Question 23. How do I reset KR1201A?
Answer:
Press the receiver's Learning button 8 times to reset the receiver.
Reset deletes all paired remotes and mode settings. Pair the remotes and set the mode again.
Question 24. Does KR1201A have memory storage, such as EEPROM?
Answer:
Yes, KR1201A has memory for paired remotes and mode settings.
The module can store up to 20 remotes.
Question 25. Can KR1201A be used for access control or automatic residential gates?
Answer:
It depends on the gate controller input and voltage.
For access-control systems with a dry contact input, KR1201A can trigger that input.
For automatic residential gates, use a receiver that matches the gate controller voltage and control input.
If the access-control system or the gate controller has a manual switch or button, connect KR1201A relay output COM and NO in parallel with that switch.
This makes the manual switch work by remote control.
KR1202-30R
Question 01. My 3-button remote opens my gate with every button, but no button closes it. My second remote opens and closes fine. How do I fix the first remote?
Answer:
Your buttons may all be set to the same direction, so they all open the gate and none closes it.
Your second remote opens and closes fine. This shows the receiver, wiring, and motor are all working. The problem is only how that first remote is paired.
Your remote has 3 buttons, so use Latching mode. Latching mode gives you one button to open, one button to close, and one button to stop.
Reset deletes all paired remotes, so you pair both remotes again after the reset.
Pair each remote with three buttons in the same Latching setup:
- Press the receiver's Learning button 8 times to reset the receiver. The indicator light flashes, then turns off.
- Press the receiver's Learning button 3 times for Latching mode. The indicator light turns on.
- Press one button on the remote (such as A). Wait until the indicator light flashes, then turns on. This button opens the gate.
- Press a second button (such as B). Wait until the indicator light flashes, then turns on. This button closes the gate.
- Press a third button (such as C). Wait until the indicator light flashes, then turns off. This button stops the gate.
- Repeat steps 2-5 for your second remote.
Use QIACHIP brand remotes for this setup. Other-brand remote compatibility is not guaranteed.
If this remote still cannot close the gate after you pair all three buttons again, the remote itself may be faulty.
KR1202-V05
Question 01. Why does only one of the two KR1202-V05 channels work?
Answer:
Your pairing steps may be wrong, so the receiver may learn only one channel.
Pair both channels again in the same Momentary setup:
- Press the receiver's Learning button 8 times to reset the receiver.
- Press the receiver's Learning button 1 time for Momentary mode. Wait until the receiver's indicator light turns off.
- Press one button on the remote (such as A). Wait until the receiver's indicator light flashes, then turns off.
- Press another button on the remote (such as B). Wait until the receiver's indicator light flashes, then turns on.
This pairs both channels in Momentary mode.
Question 02. Why does button A on one remote work in reverse from the other remotes?
Answer:
That transmitter may have been paired with a different button order.
Reset the receiver once. Then pair all transmitters again with the same button order. Example for Momentary mode:
- Press the receiver's Learning button 8 times to reset the receiver.
- Press the receiver's Learning button 1 time for Momentary mode. Wait until the receiver's indicator light turns off.
- Press button A on transmitter 1 first. Wait until the receiver's indicator light flashes, then turns off.
- Press button B on transmitter 1 second. Wait until the receiver's indicator light flashes, then turns on.
- Repeat the same A/B button order for each transmitter.
This pairs each transmitter with the same A/B button order.
Question 03. Why does my motor go up but not down after KR1202-V05 worked normally for one week?
Answer:
If the motor worked normally before but now goes up and not down, the first thing to check is loose wiring.
The likely causes are:
-
One motor output wire may have become loose. Check the wires on M1 and M2, especially the wire for the failed direction.
-
The remote battery may be weak. One button signal may still work, but the other button signal may be too weak. Replace the remote battery. Then pair the remote and receiver again.
If the wiring is tight, the battery is new, and pairing again does not fix it, the receiver may have a fault. In that case, apply for a return or replacement.
Question 04. How do I pair all 4 transmitters for my theft alarm if only 1 transmitter works now?
Answer:
This is usually because the receiver was reset before each new transmitter was paired.
Do not press the receiver's Learning button 8 times before pairing each new transmitter.
Reset deletes all paired transmitters. If you reset before pairing the next transmitter, only the last transmitter may work.
Pair the 4 transmitters again with the steps below:
- Press the receiver's Learning button 8 times to reset the receiver once.
- Press the receiver's Learning button 1 time for Momentary mode. Wait until the receiver's indicator light turns off.
- Press the first remote button on transmitter 1. Wait until the receiver's indicator light flashes, then turns off.
- Press the second remote button on transmitter 1. Wait until the receiver's indicator light flashes, then turns on.
- Repeat the same button order for transmitter 2, transmitter 3, and transmitter 4.
Use QIACHIP brand transmitters for this setup. Other-brand transmitter compatibility is not guaranteed.
Question 05. Why does my gate open and close by itself without pressing the remote? Is it interference?
Answer:
Yes, it may be interference from a nearby same-frequency signal.
If the receiver learned that interference signal during pairing, that signal may control the receiver. Then the receiver may open or close the gate without pressing your remote.
Pair the remote and receiver again in a place with no signal interference:
- Move the receiver away from the gate and nearby interference sources.
- Pair your remote and receiver again.
- Connect the receiver to the gate equipment again.
- Test the gate with your remote.
If the gate location always has same-frequency interference, we do not recommend this 433.92MHz wireless controller. Use a different-frequency controller to avoid signal interference.
KR2402A
Question 01. Why can my remote control Relay 1 but not Relay 2 in KR2402A Momentary mode?
Answer:
Your pairing steps may be wrong, so your remote can only control Relay 1.
Pair the receiver again with the steps below:
- Press the receiver's Learning button 8 times to reset the receiver.
- Press the receiver's Learning button 1 time for Momentary mode.
- Press one button on the remote (such as A). Wait until the receiver's indicator light flashes, then turns off.
- Press another button on the remote (such as B). Wait until the receiver's indicator light flashes, then turns on.
This sets both relays in Momentary mode.
Question 02. Why do button A and button B both control Relay 1 after KR2402A Momentary pairing?
Answer:
Your pairing steps may be wrong, so button A and button B both control Relay 1.
Pair the receiver again with the steps below:
- Press the receiver's Learning button 8 times to reset the receiver.
- Press the receiver's Learning button 1 time for Momentary mode.
- Press button A on the remote. Wait until the receiver's indicator light flashes, then turns off.
- Press button B on the remote. Wait until the receiver's indicator light flashes, then turns on.
This sets button A for Relay 1 and button B for Relay 2 in Momentary mode.
Question 03. What is the difference between KR2402A Momentary, Toggle, and Latching modes?
Answer:
KR2402A has three working modes.
Momentary mode: the relay turns on while you hold the remote button. The relay turns off when you release it.
Toggle mode: press the remote button once, and the relay turns on. Press the same remote button again, and the relay turns off.
Latching mode: press remote button A, and Relay 1 turns on. Press remote button B, and Relay 2 turns on while Relay 1 turns off.
Use Momentary mode for hold-to-run control. Use Toggle mode for on / off control. Use Latching mode when Relay 1 and Relay 2 must not stay on at the same time.
Question 04. Can KR2402A trigger Relay 1 and Relay 2 one by one automatically?
Answer:
No, KR2402A does not have an automatic sequence mode.
Relay 1 and Relay 2 are controlled by paired remote buttons. In Momentary mode or Toggle mode, remote button A can control Relay 1, and remote button B can control Relay 2.
Question 05. How do I set two remotes to control Relay 1 and Relay 2 on KR2402A?
Answer:
Pair one button on each remote in the same setup. The first button you pair controls Relay 1. The second button you pair controls Relay 2.
Example for Toggle mode:
- Press the receiver's Learning button 2 times for Toggle mode. Wait until the receiver's indicator light turns off.
- Press a button on the first remote. Wait until the receiver's indicator light flashes, then turns off.
- Press a button on the second remote. Wait until the receiver's indicator light flashes, then turns on.
Question 06. Can I pair multiple remotes to channels A and B in Momentary mode?
Answer:
Yes, KR2402A can pair multiple remotes to channels A and B in Momentary mode.
For each new remote, pair button A and button B in the same Momentary setup. Do not pair button A alone.
Press the receiver's Learning button 8 times only if you want to reset the receiver. Reset deletes all paired remotes.
Question 07. How do I use KR2402A Momentary mode to control a two-direction motor with button A and button B?
Answer:
Use KR2402A Momentary mode through the motor controller control inputs, not through the motor power wires.
Pair the receiver with the steps below:
- Press the receiver's Learning button 1 time for Momentary mode. Wait until the receiver's indicator light turns off.
- Press remote button A for one motor direction. Wait until the receiver's indicator light flashes, then turns off.
- Press remote button B for the other motor direction. Wait until the receiver's indicator light flashes, then turns on.
Button A: one motor direction runs while you hold button A. Button B: the other motor direction runs while you hold button B.
The motor controller must prevent both directions from running at the same time.
Question 08. Does the KR2402A relay stay on after power loss?
Answer:
No, the relay cannot stay on when the power is off.
KR2402A can remember the paired remote and working mode after power loss. The relay state still needs power. After power comes back, the next relay action depends on the mode and remote command.
Question 09. How should I wire KR2402A for my load?
Answer:
It depends on what load you want to control.
Use the KR2402A wiring diagram that matches your load. Turn off power before wiring.
+V / -V: receiver power input, DC 5V-60V.
Relay 1 output terminals: NO1 / COM1 / NC1. Relay 2 output terminals: NO2 / COM2 / NC2.
The relay output is a dry contact. This means the relay output works like a switch. It does not output power by itself.
Question 10. Can one remote control two KR2402A receivers in Momentary mode and Toggle mode?
Answer:
Yes, it is possible, but we do not recommend it if the two receivers are close to each other.
One remote sends the same RF signal. If both receivers are within the same remote-control range, both may receive the signal and operate.
Momentary mode and Toggle mode do not separate the RF signal. To avoid interference, keep the two receivers far enough apart, or use separate remotes.
Question 11. Can I add a signal amplifier to KR2402A to reach 100 meters?
Answer:
No, we do not recommend adding a signal amplifier to the receiver.
Changing the receiver may damage KR2402A or make the remote signal unstable.
To improve remote-control range, fully extend the receiver antenna. Keep the receiver antenna away from metal parts and motor wires.
If you need about 100 meters, use a longer-range remote with an antenna.
Wireless Receiver Module
RX480E-4
Question 01. Can each of the four RX480E-4 output pins be set to a different mode, such as D3 in Momentary mode and D2 in Toggle mode?
Answer:
No. You cannot set each output pin to its own mode. However, you can choose one of these working modes:
- Reset the module: Press the Learning button 8 times
- Momentary mode: Press the Learning button 1 time
- Toggle mode: Press the Learning button 2 times
- Latching mode: Press the Learning button 3 times
- Two Toggle channels + two Momentary channels: Press the Learning button 4 times
- Two Latching channels + two Momentary channels: Press the Learning button 5 times
- Two Latching channels + two Toggle channels: Press the Learning button 6 times
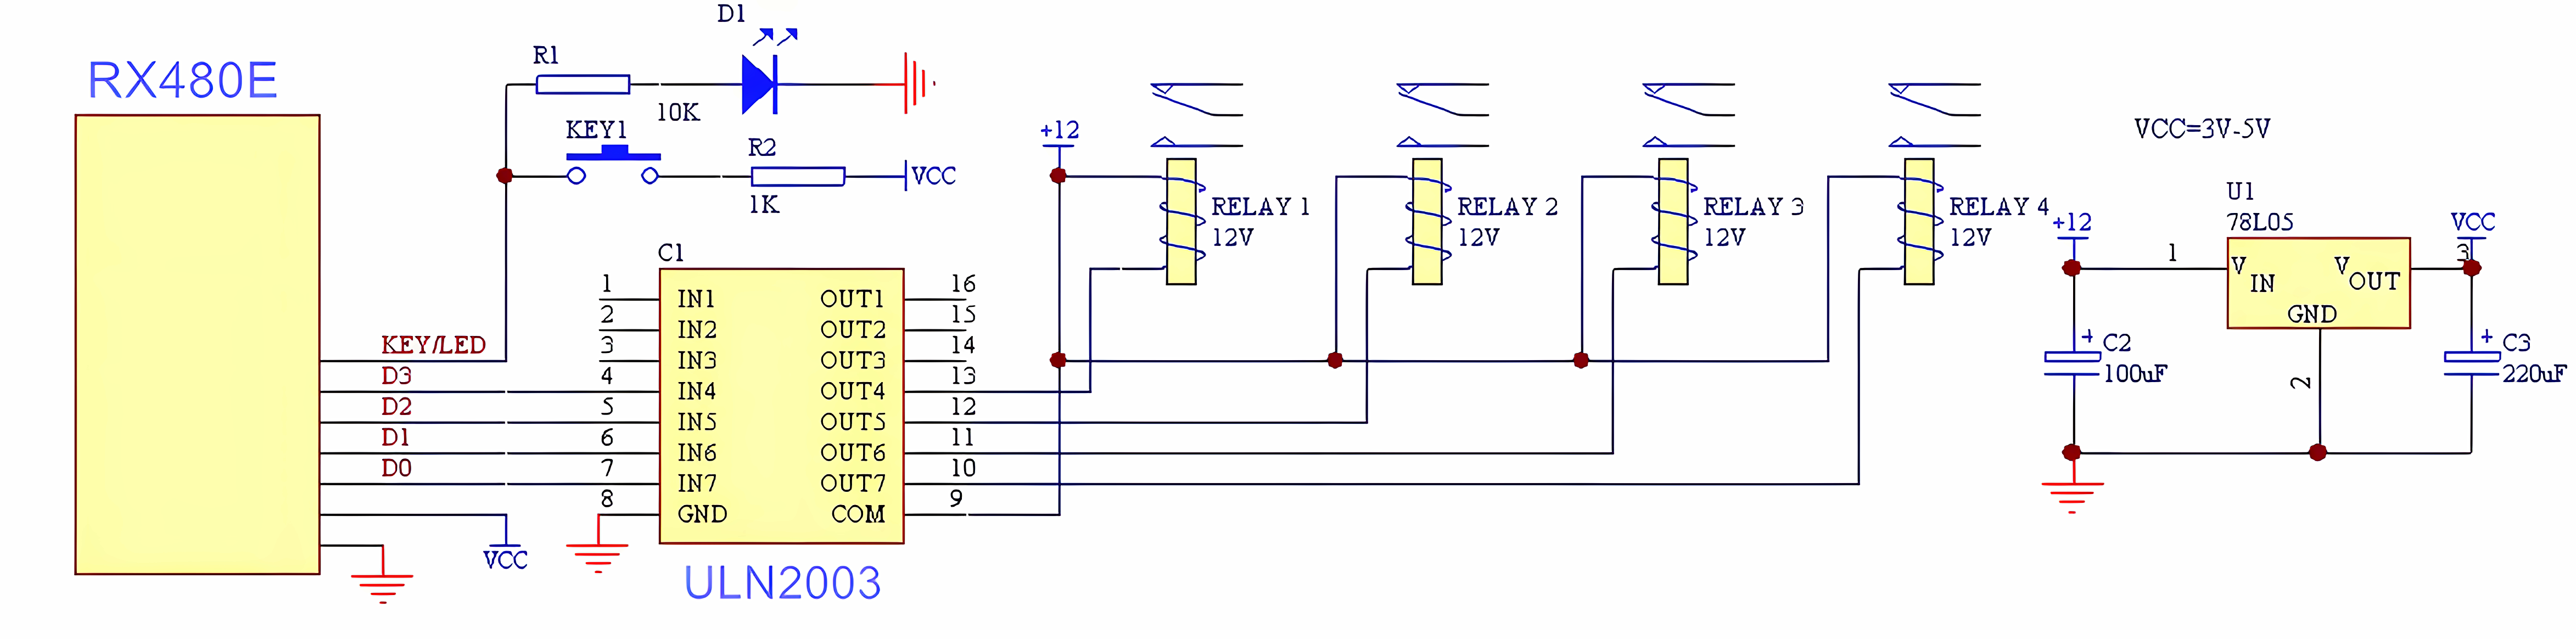
Question 02. Can the four RX480E-4 outputs drive a load directly? How to connect the four outputs to an external transistor or relay?
Answer:
We do not recommend connecting the four RX480E-4 outputs to a load directly. They provide high-level signals, and the maximum output current is 10 mA.
The four outputs need a transistor to increase the current before driving a relay, motor, or other load. This wiring requires basic circuit design knowledge. You can also follow our wiring diagram directly.
Question 03. Do I need to pair the transmitter and receiver again after a long power outage?
Answer:
No. Once the transmitter and receiver are paired, they do not need to be paired again after a power outage.
Question 04. Are the four outputs of RX480E-4 high-level or low-level outputs?
Answer:
All four outputs of the RX480E-4 are high-level outputs.
If you need low-level output, add a transistor inverting circuit after the four outputs. This wiring requires basic circuit design knowledge.
Question 05. Why can't I change the working modes after connecting an external button and LED to the VT pin?
Answer:
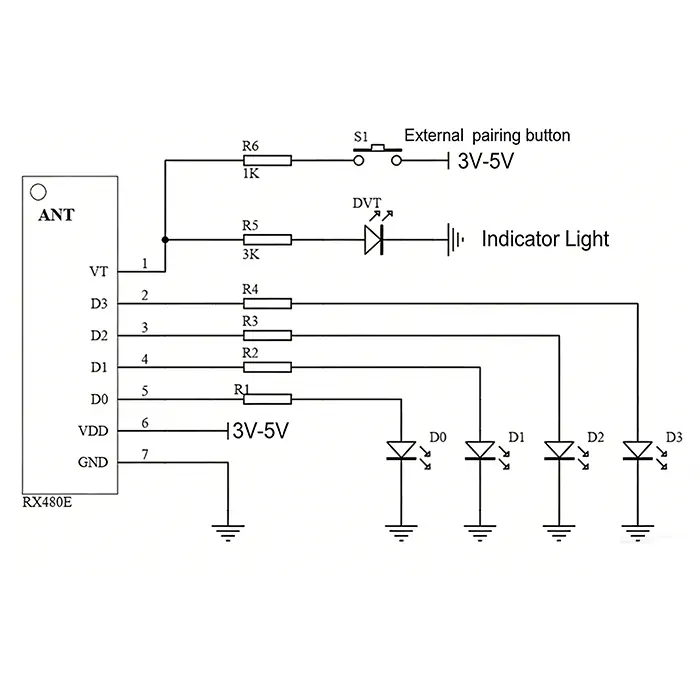
The wiring may be wrong. Follow our wiring diagram.
Connect a current-limiting resistor in series with the external LED. Otherwise, the VT pin voltage will be too low. When the VT pin voltage is too low, the module cannot change working modes.
Question 06. Is Momentary mode the factory default output mode for RX480E-4?
Answer:
No. RX480E-4 has no factory default mode. Choose the mode you need. You can find the pairing steps in the RX480E-4 user manual.
Question 07. Does the RX480E-4 receiver support EV1527 encoding? Can it pair with other EV1527 remote controls?
Answer:
Yes. The RX480E-4 receiver uses EV1527 learning code. Pair the remote control and receiver once before use.
We recommend QIACHIP remotes. We do not guarantee pairing compatibility with other-brand remotes.
Question 08. How to find the RX480E-4 user manual?
Answer:
You can find the full RX480E-4 user manual here: QIACHIP RX480E-4 Instruction Manual
It covers the product size, component description, wiring diagram, antenna size, and every working mode setting step.
RX480E-4C
Question 01. Can each of the four RX480E-4C output pins be set to a different mode, such as D3 in Momentary mode and D2 in Toggle mode?
Answer:
No. You cannot set each output pin to its own mode. However, you can choose one of these working modes:
- Reset the module: Press the Learning button 8 times
- Momentary mode: Press the Learning button 1 time
- Toggle mode: Press the Learning button 2 times
- Latching mode: Press the Learning button 3 times
- Two Toggle channels + two Momentary channels: Press the Learning button 4 times
- Two Latching channels + two Momentary channels: Press the Learning button 5 times
- Two Toggle channels + two Latching channels: Press the Learning button 6 times
- Two Latching channels + two Latching channels: Press the Learning button 7 times
Question 02. Can the four RX480E-4C outputs drive a load directly? How to connect the four outputs to an external transistor or relay?
Answer:
We do not recommend connecting the four RX480E-4C outputs to a load directly. They provide high-level signals, and the maximum output current is 10 mA.
The four outputs need a transistor to increase the current before driving a relay, motor, or other load. This wiring requires basic circuit design knowledge. You can also follow our wiring diagram directly.
Question 03. Do I need to pair the transmitter and receiver again after a long power outage?
Answer:
No. Once the transmitter and receiver are paired, they do not need to be paired again after a power outage.
Question 04. Are the four outputs of RX480E-4C high-level or low-level outputs?
Answer:
All four outputs of the RX480E-4C are high-level outputs.
If you need low-level output, add a transistor inverting circuit after the four outputs. This wiring requires basic circuit design knowledge.
Question 05. Why can't I change the working modes after connecting an external button and LED to the VT pin?
Answer:
The wiring may be wrong. Follow our wiring diagram.
Connect a current-limiting resistor in series with the external LED. Otherwise, the VT pin voltage will be too low. When the VT pin voltage is too low, the module cannot change working modes.
Question 06. Is Momentary mode the factory default output mode for RX480E-4C?
Answer:
No. RX480E-4C has no factory default mode. Choose the mode you need. You can find the pairing steps in the RX480E-4C user manual.
Question 07. Does the RX480E-4C receiver support EV1527 encoding? Can it pair with other EV1527 remote controls?
Answer:
Yes. The RX480E-4C receiver uses EV1527 learning code. Pair the remote control and receiver once before use.
We recommend QIACHIP remotes. We do not guarantee pairing compatibility with other-brand remotes.
Question 08. How to find the RX480E-4C user manual?
Answer:
You can find the full RX480E-4C user manual here: QIACHIP RX480E-4C Instruction Manual
It covers the product size, component description, wiring diagram, antenna size, and every working mode setting step.
RX480E-1A
Question 01. Does RX480E-1A have a Learning button on the module?
Answer:
No. RX480E-1A has no Learning button on the module. It has a KEY pin instead.
Connect an external switch or button to the KEY pin before use. All pairing and mode settings use this external button. Without it, you cannot pair a remote control or set a working mode.
Question 02. How to set Power-On Auto-Engagement on RX480E-1A?
Answer:
Connect an external button to the KEY pin first. Then press the external button 6 times. The indicator on the module flashes and then turns off. The setting is complete.
After this setting, the output pin outputs a high level directly every time the module is powered on.
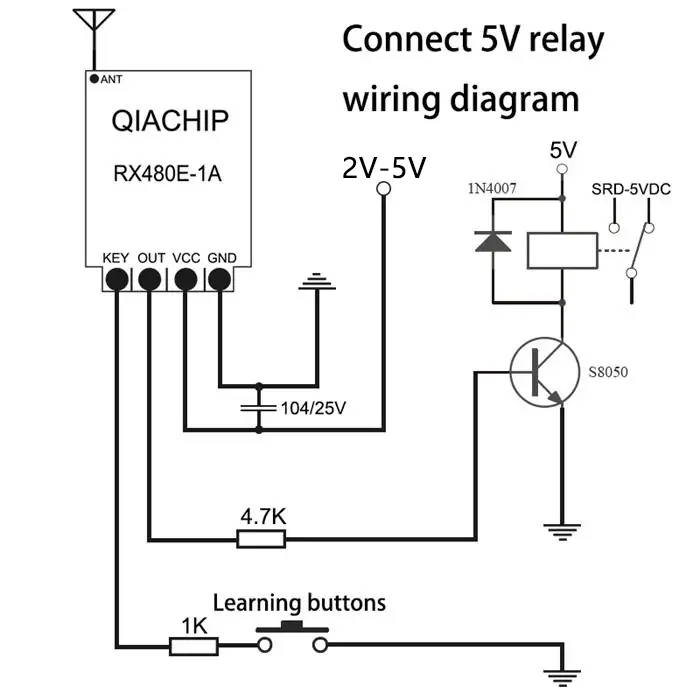
Question 03. Can the RX480E-1A output drive a load directly? How to connect the output to an external transistor or relay?
Answer:
We do not recommend connecting the RX480E-1A output to a load directly. It provides a high-level signal, and the maximum output current is 10 mA.
The output needs a transistor to increase the current before driving a relay, motor, or other load. This wiring requires basic circuit design knowledge. You can also follow our wiring diagram directly.
Question 04. Do I need to pair the transmitter and receiver again after a long power outage?
Answer:
No. Once the transmitter and receiver are paired, they do not need to be paired again after a power outage.
Question 05. Is the RX480E-1A output a high-level or low-level output?
Answer:
The RX480E-1A output is a high-level output.
If you need low-level output, add a transistor inverting circuit after the output. This wiring requires basic circuit design knowledge.
Question 06. Is Momentary mode the factory default output mode for RX480E-1A?
Answer:
No. RX480E-1A has no factory default mode. Connect an external button to the KEY pin, then choose the mode you need. You can find the pairing steps in the RX480E-1A user manual.
Question 07. Does the RX480E-1A receiver support EV1527 encoding? Can it pair with other EV1527 remote controls?
Answer:
Yes. The RX480E-1A receiver uses EV1527 learning code. Pair the remote control and receiver once before use.
We recommend QIACHIP remotes. We do not guarantee pairing compatibility with other-brand remotes.
Question 08. How to find the RX480E-1A user manual?
Answer:
You can find the full RX480E-1A user manual here: QIACHIP RX480E-1A Instruction Manual
It covers the product size, component description, wiring diagrams, and every working mode setting step.
RX480E-868
Question 01. How to switch the RX480E-868 mode between receive and transmit?
Answer:
Press the module's Learning button 5 times to switch the mode. RX480E-868 is in receive mode by default.
From receive mode to transmit mode:
- Press the module's Learning button 5 times.
- Wait until the red indicator flashes twice. The module is now in transmit mode.
From transmit mode to receive mode:
- Press the module's Learning button 5 times.
- Wait until the red indicator flashes 5 times. The module is now in receive mode.
To check the current mode, power the module off and on again. Two red flashes mean receive mode. Two blue flashes mean transmit mode.
Note: 5 presses always change the mode. Use 1, 2, or 3 presses to set a working mode.
Question 02. Can RX480E-868 pair with a 433 MHz remote control?
Answer:
No. RX480E-868 works on 868 MHz only. It cannot pair with a 433 MHz remote control.
Question 03. Can the four RX480E-868 outputs drive a load directly? How to connect the four outputs to an external transistor or relay?
Answer:
We do not recommend connecting the four RX480E-868 outputs to a load directly. They provide high-level signals in receive mode, and the maximum output current is 10 mA.
The four outputs need a transistor to increase the current before driving a relay, motor, or other load. This wiring requires basic circuit design knowledge. You can also follow our wiring diagram directly.
Question 04. Do I need to pair the transmitter and receiver again after a long power outage?
Answer:
No. Once the transmitter and receiver are paired, they do not need to be paired again after a power outage.
Question 05. Are the four outputs of RX480E-868 high-level or low-level outputs?
Answer:
In receive mode, all four D0-D3 pins of the RX480E-868 are high-level outputs. In transmit mode, the same four pins become low-level signal inputs.
If you need low-level output in receive mode, add a transistor inverting circuit after the four outputs. This wiring requires basic circuit design knowledge.
Question 06. Is Momentary mode the factory default output mode for RX480E-868?
Answer:
No. RX480E-868 has two kinds of mode. Receive mode is the factory default. The output working mode — Momentary, Toggle, or Latching — is not set at the factory. You choose it when you pair the remote control.
To set Momentary mode:
- Power the module on. Two red flashes mean the module is in receive mode. If you see two blue flashes, press the module's Learning button 5 times to go back to receive mode.
- Press the module's Learning button 1 time. The red indicator flashes once and then stays on.
- Press the button on the remote control. The module's red indicator flashes 5 times. Momentary mode is set.
Question 07. How to find the RX480E-868 user manual?
Answer:
You can find the full RX480E-868 user manual here: QIACHIP RX480E-868 Instruction Manual
It covers the product size, component description, and every receive mode and transmit mode setting step.